Outline:
Have you ever launched a design project with high hopes, only to find yourself juggling endless revisions and mixed messages in design services? If so, you’ve witnessed firsthand how a muddled design process can drain your energy, time, and budget. A well-crafted design brief can spare you that chaos. It sets a clear path from concept to completion, saving you from guesswork and misunderstandings.
What Exactly Is a Design Brief
In simplest terms, a design brief is a roadmap that explains the vision for a project. It lays out objectives, defines who’s involved, identifies the target audience, and clarifies the resources available. Think of it as the go-to document of every professional custom web design agency that keeps everyone focused on the same end goal. By creating a solid design brief, both clients and designers can work more efficiently, aligning their ideas and avoiding costly pitfalls down the line.
In this article, we’ll look at what makes a design brief essential and pinpoint the elements it should include. More importantly, you’ll discover exactly how to write design brief material that resonates with stakeholders and fosters outstanding designs. Let’s get started by delving into the fundamentals.
What Is a Design Brief and Why You Need It
A design brief is a document that outlines the mission, scope, and strategy of a design project. Its role is to give everyone involved a mutual understanding of the work ahead. If you’ve been struggling with how to write design brief documents that truly streamline your process, you’re not alone. Many people treat briefs as a formality, but done right, they transform scattered ideas into a coherent plan.
The Importance of Getting It Right
- Clear Objectives: A solid design brief spells out exactly what you need to achieve, whether it’s increasing brand recognition or improving user experience.
- Reduced Misunderstandings: Setting expectations early on cuts down on confusion. Everyone is on the same page about deliverables and desired outcomes.
- Efficient Use of Resources: When you agree on budget, timeline, and requirements from the start, you avoid costly course corrections.
- Brand Consistency: By laying out brand guidelines, tone of voice, and style preferences, you maintain a coherent identity across all design work.
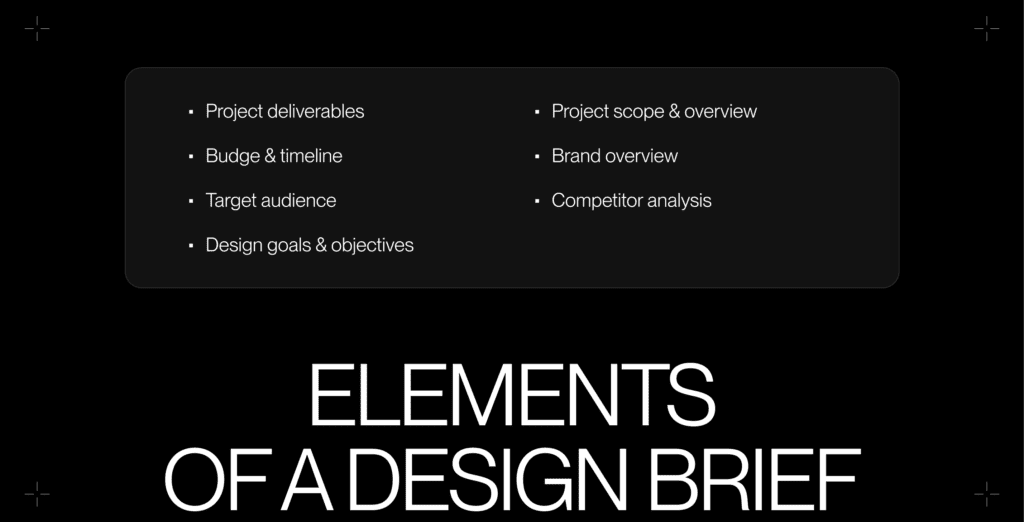
Key Components of an Effective Design Brief
A design brief is only as powerful as the information it contains. Here are the critical parts you should always include:
Project Overview and Scope
Provide a concise summary of the project. Are you revamping a product package, designing a new logo, or refreshing a website? Lay it all out so everyone knows precisely what’s at stake. This is also where you define project boundaries—clarifying what the assignment covers and what falls outside its scope.
Brand Overview
Every design project should reflect your brand’s values, mission, and personality. Use this section to outline your brand’s unique traits—like color palettes, typography preferences, and core messaging guidelines. This helps the design stay true to your identity.
Competitor Analysis
Taking the time to look into your competitors is invaluable for figuring out what sets you apart. Summarize how competitors position themselves, and highlight any gaps in the market that you intend to fill. A thoughtful competitor analysis can shine a light on the areas where you can stand out.
Project Deliverables
Be explicit about what you expect as the final output. Do you need a logo in various file formats? A website mockup? Promotional materials? Listing specific deliverables helps prevent last-minute surprises and unwanted do-overs.
Budget and Timeline
A clear statement of your budget and deadlines is essential for both sides. When you map out checkpoints and deadlines, it’s easier to stay on track and adjust if any unforeseen issues pop up. If you’re aiming to master how to write design brief documents that minimize financial headaches, don’t skip this part.
Target Audience
Who is the design meant to serve? If you’re speaking to busy parents, your tone, visuals, and overall approach will differ from a design meant for tech-savvy professionals. A firm grasp of your audience keeps the project grounded and relevant.
Design Goals and Objectives
This section is the heart of the brief. Are you trying to boost sales, strengthen brand awareness, or simply modernize your look? Goals should be clear and measurable, so you can track success once the design is complete.
How to Write Design Brief: A Step-by-Step Guide
You might be wondering exactly how to write design brief documentation in a way that ties all these components together. Below is a practical roadmap to help you pull it off.
01 Start With Research
A strong design brief begins by gathering relevant details that will steer the entire project. Take these steps:
- Gather Existing Brand Assets: Collate brand guidelines, previous marketing materials, color schemes, logo design and typography resources. Having everything at your fingertips makes it easier to stick to a consistent look and feel.
- Analyze Competitor Designs: Look for inspiration in your industry, but also note what you want to avoid. This step helps you come up with fresh, standout concepts.
If you’ve ever felt stuck on how to write design brief material that aligns with broader business goals, research is your first lifeline. It gives you context, background, and insight into what resonates with your audience.
02 Set Clear Objectives
A typical trap is to say something generic like, “I want a nice-looking design.” To avoid that, break down your objectives using the SMART approach (Specific, Measurable, Achievable, Relevant, and Time-bound). Whether you need a 30% increase in click-through rates or a user-friendly mobile app interface, be precise about what “success” looks like.
03 Define the Target Audience Thoroughly
To create designs that really click with the people you’re trying to reach, you must identify your audience’s pain points, preferences, and habits:
- Use Buyer Personas: Craft fictional representations of your ideal customers. What do they do for a living? How old are they? What challenges do they face?
- Explain the Problem to Solve: If your audience struggles with finding quick meal solutions, a design that highlights convenience might resonate best.
Understanding these nuances becomes far simpler once you master how to write design brief documentation that incorporates detailed audience insights.
04 Outline Scope and Deliverables
Make it crystal clear what the project entails. Are you expecting three logo variations, a website prototype, or a full brand identity package? Spell out the deliverables and set priorities. This step helps manage expectations and prevents miscommunication—especially useful when multiple stakeholders are involved.
05 Establish Timelines and Checkpoints
Time can slip away fast in any creative process, so outline realistic milestones:
- Include Buffer Time: Leave room for revisions, testing, and unexpected hurdles.
- Plan for Unforeseen Challenges: If you know a certain phase might be more complex—like user testing—pad in extra days or weeks.
After all, the best guidance on how to write design brief plans revolves around honest, carefully considered scheduling.
06 Clarify Budget
Design can be subjective, and budgets can balloon when new ideas pop up unexpectedly. To keep spending in check:
- Break Down Costs: If possible, show how funds are allocated for each phase, such as design drafts, revisions, and final production.
- Highlight Constraints or Trade-Offs: If you have a tight budget, you might opt to develop fewer design variations or focus on a single deliverable to maintain quality.
07 Identify Your Brand’s Core Elements
It’s easy to lose track of brand consistency in the excitement of creating something new. Provide style guides, brand values, color codes, and examples of successful past designs. This unifies the final output and ensures the design feels cohesive with your overall identity.
08 Set Up the Feedback and Approval Process
One major question many people grapple with when learning how to write design brief documents is how to manage feedback loops:
- Define Roles: Who’s collecting feedback from the team? Who has the final sign-off?
- Specify Tools: Will you use a project management tool, email, or virtual meetings to gather comments?
Taking the guesswork out of feedback reduces friction and speeds up the review cycle.

Common Pitfalls and How to Avoid Them
Even the most seasoned professionals can stumble if they overlook some common issues. By staying alert to common mistakes, you’ll enhance your skills at how to write design brief documentation that truly guides a project from rough concept to polished deliverable.
Vague Objectives
Saying “Design something visually appealing” isn’t enough. Specify if you’re aiming for brand recognition, higher conversions, or improved accessibility.
Incomplete Audience Insights
If you skip researching user behavior, your final design might fall flat. Pinpoint the audience’s mindset so you can address their needs effectively.
Misaligned Budget vs. Expectations
It’s easy to overshoot if your design dreams aren’t linked to your financial reality. Keep the brief realistic, and highlight where sacrifices might be necessary.
Overly Ambitious Timelines
Creativity can’t always be rushed. Cushion your schedule with extra time for edits and brainstorming so you’re not forced to cut corners.
Lack of Collaboration
Designs often turn out poorly when communication is one-sided. Encourage your team to share ideas, give feedback regularly, and stay engaged.
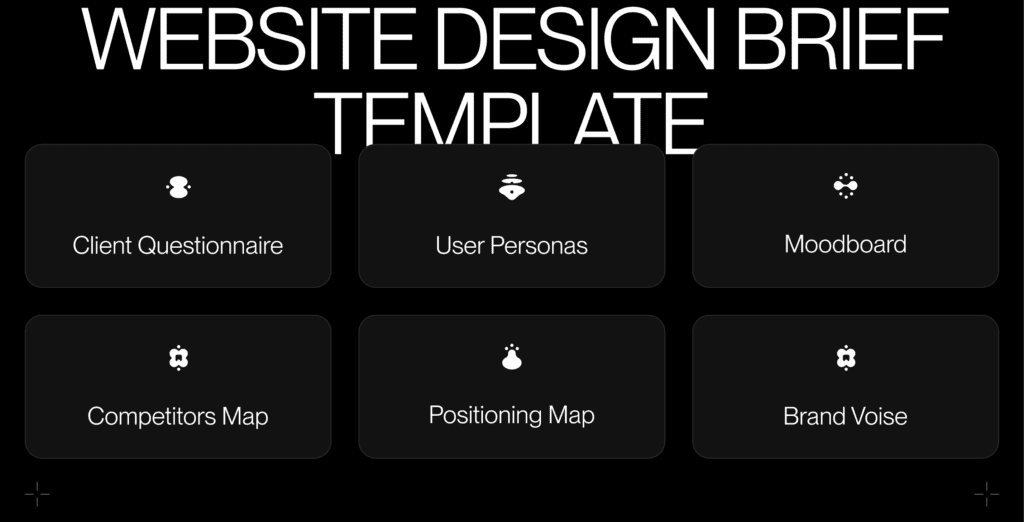
Design Brief Template
To further illustrate how to write design brief structures, here’s a template that can serve as a starting point. It is designed to guide the Designer or Project Manager in creating a comprehensive design brief. The information gathered here will be used to understand the client’s needs and translate them into effective design solutions.
Client Questionnaire (to be completed by the Client)
This section is to be completed by the client to provide foundational information.
- What’s your main reason for initiating this project? (This helps the Designer/PM understand the project’s core purpose.)
- How would you describe your brand’s personality in three words? (This provides a quick snapshot of the brand’s desired image.)
- Who is your primary competitor or closest peer in the market? (This allows the Designer/PM to conduct competitive analysis.)
- Who is your ideal customer or target audience? (This provides a starting point for the Designer/PM to build detailed user personas.)
- What are your must-have design elements (colors, fonts, images)? (This outlines specific client preferences.)
- Are there any design styles you prefer or want to avoid? (This prevents misinterpretations of design direction.)
- What does success look like for this project? (This defines measurable goals and outcomes.)
- Do you have any internal deadlines or external event dates influencing the timeline? (This establishes crucial time constraints.)
- What is your approximate budget for this project? (This helps define the scope and feasibility of the project.)
- Who will be involved in providing feedback and approvals? (This clarifies the decision-making process.)
Designer/PM Created Content (Based on Client Input and Research)
The following sections are to be developed by the Designer or PM based on the client’s responses and independent research.
User Personas
Create detailed profiles of the client’s target audience, not your own. Include:
- Demographic information
- Goals and motivations
- Pain points and challenges
- Typical behaviors and habits
These personas are developed by the Designer/PM through research and interpretation of the client’s provided target audience information.
Moodboard
Assemble a collection of images, color swatches, and design examples that capture the overall style or vibe you’re aiming for. This visual reference keeps everyone on the same wavelength.
Competitors Map
Chart out direct and indirect competitors, noting their strengths and weaknesses. This helps see where the brand stands in a busy marketplace.
Positioning Map
Visualize the client’s brand compared to competitors on key factors (e.g., price, quality, innovation) to clarify the desired market position.
Brand Voice
Based on the client’s brand personality, describe the appropriate tone and style for all communication to make sure that the brand voice is consistent throughout all aspects of the design. Provide examples of preferred language and tone.
Extra Tips for a Good Design Brief
Keep It Concise but Comprehensive: Pack in all essential details without turning the document into a convoluted novel.
Use Visual Aids: Photos, color palettes, and references can speak volumes about your intended style.
Iterate and Update: Your brief doesn’t have to be set in stone. As you gather new insights, adjust your document to reflect changing objectives or constraints.
Encourage Collaboration: Stay open to input from team members, stakeholders, and even end-users if possible. Multiple perspectives can strengthen your final outcome.
On a Final Note
Crafting a strong design brief might feel daunting, but once you figure out how to write design brief materials effectively, you’ll never want to start a project without one. It cuts through guesswork, encourages consistent branding, and helps you sidestep many common traps.
If you’re still unsure about how to write design brief documentation, consider using the provided template as your launching pad. You can tweak it for each project, ensuring your vision, objectives, and resources are crystal clear.
Looking for more hands-on guidance? Reach out to us for a one-on-one consultation. By mastering how to write design brief plans, you’ll ensure every new design project starts on the right foot—and finishes with results you can be proud of.

Copied!